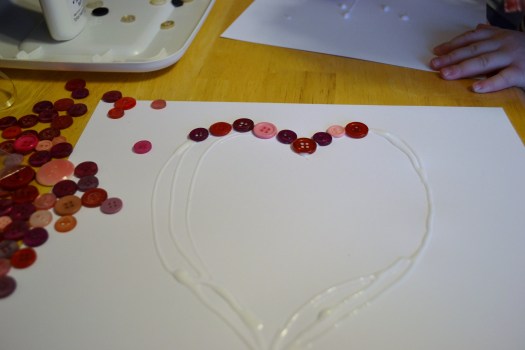
Valentine Button Heart

Yesterday, I was feeling all crafty in a huge, low key sort of way. I mean, I reeeally wanted to make something but wasn’t feeling up to anything intense or…you know…hard.

I knew that hearts would be a necessary part of the project and since I really like buttons, I figured the two could hold their own in a big way as well.

Then the doorbell rang and a kind, sweet friend brought over Valentine treats for us. Ummm…sugar cookies–

and pink popcorn balls. Oh. My. Word.

Fabulous.

So with the complete creative inspiration that can only come from the perfect sugar cookie, I dug through the button stash and pulled out all the red and pink ones…and an occasional lavender…just because.

Then, on a whim, outlined a heart on an 8 x 10 piece of cardstock–with white glue. I thought about using a hot glue gun…for about 10 seconds. Then I remembered that we still aren’t speaking. Don’t ask.

One thing, or button, led to another and before I knew it, those pretty buttons were evolving…

into this lovely little button heart. I hurried to find a frame and since this one fit perfectly–I snagged it and poked my pretty little button mosaic into it.

Twenty minutes well spent. Cookies, pink popcorn and a bucket full of buttons.

Life is good.

Happy Valentine’s Day!!

Quick Christmas Gifts

Family Faces Match-Up

Now you may just recognize many of these quick gifts from the past–but a good thing bares repeating–right? So, in the hopes of offering a few fun, fast ideas to help your holidays have a cozy, handmade feel–I’m dusting off a few favorites.

Button Bauble Bracelet

Personal History Prompt Jar

Washcloth Bibs

Covered Clipboards

Flowered Headbands

Soma Cube Puzzle

Mosiac Bead Bracelet

Hope this helps with your Christmas lists my friends. Let me know…   :}

Happy holiday crafting!!

Turkey Cookie Pops

Ok, now seriously–how adorable is this guy? I mean, I just want to kiss him…

and then, of course, I want to gobble him up…

along with his entire sweet little family.

I first saw this fellow on Pinterest, but no matter how hard I searched, I couldn’t find any directions to make him. So, being the sturdy mountain folk that we are–we came up with our own way. Oh yeah…we shall not be thwarted.

Here’s all you need:

~Golden Oreos

~Nutter Butter Bites

~Gummy Raspberries

~Candy Corn- you can find them in the bulk candy section

~Royal Icing

~Sucker sticks

Directions:

Unscrew two Oreos and gently press the two icing sides together to make your own “double stuff” cookie. Set the unfrosted cookie halves off to the side to eat later…or now. Either way.

Carefully poke the tips of 5 or 6 candy corn pieces into the frosting–around the edge for the tail feathers.

Next, with a smidge of icing–glue on Nutter Butter bite onto the Oreo for the head.

Break off a tip of another candy corn and “glue” it on for the beak.

With scissors, cut the sides of the gummy raspberry into little waddles. Aren’t they just perfect? Glue them along the top and side of beak. Add icing eyes.

~If you’re like me, this is the hardest part. I swear, I can ruin the cutest project on the face of the earth by trying to make the eyes. THIS time, I let Lyndi make a whole sheet of icing eyeballs so that I have a two year supply.

Holding the cookie carefully together, slide a sucker stick into the middle frosting–and tie a cute little bow around it.

These would make pretty little place markers for the Thanksgiving table–or a lovely little welcome prize for your holiday guests–don’t you think?

This image has an empty alt attribute; its file name is Perfect-Size.png

“Let us be grateful to people who make us happy; they are the charming gardeners who make our souls blossom.”

— Marcel Proust

Halloween Scrap Banner

I looked around this morning and found a few spots that needed a little last minute Halloween sprucing up. It’s not too late!

Oh, the other rooms were ready for the day but that one wall in my room was just a bit too…hmmmm…boring. Yes, that’s the word.

Not acceptable!!

There were just enough scraps from Lily and Beckham’s Halloween bags to toss together a pretty little banner and believe me—it was incredibly simple.

All you do is:

Cut Halloween scrap fabric into strips about 1 inch by 7 to 9 inches. The length wasn’t perfect science–just approximate measurements were fine.

Loop each strip around a piece of cord, rope or in my case–clothes line. I used about 4 feet of it.

Carefully pull the two ends of the fabric behind the rope and through the loop…

then gently tighten it like a tiny little neck tie. Ohhhh…sooo….cute!

Keep adding the knotted strips until you have the length of banner you need.

And POOF!

Previously boring wall–cured!

:} Oh, and the sweet “Happy Halloween” banner with the spooky skulls? Why, it’s from my clever little daughter’s blog–Prairie Grass Patterns.

How’s that? Two cute things for the price of one! Oh, wait…they’re both free. Bonus.

Happy Halloween my friends!

This image has an empty alt attribute; its file name is Gr-Sig-right-size-e1547674736862.png

Halloween Candy Garland

Now, if you’re an old timer to Gracious Rain you may be sayin’ “Whoa, Nellie–you already made this sweet, little garland a couple of years back!”

And I would say back to you–“That’s right…sort of.”

First of all, the last candy garland got eaten by “woodland creatures” so a new one was in order.  This time, it’s much easier to make. Seriously, took about 20 minutes start to finish.

Just a simple crochet chain stitch and every 10 stitches I wrapped the loop around one end of the taffy, pulled it tight and kept right on going. Cinchy.

However, if you have a house with little people in it, like we do, you’ll have to either hang it up high or just be ready to have it nibbled on by the critters.

This time–I’ll take my chances with the outdoor squirrels.

This image has an empty alt attribute; its file name is Gr-Sig-right-size-e1547674736862.png