Asian Lettuce Wraps

These are incredible. From the very minute that we first had them at that fancy restaurant at Jacob’s graduation a couple of year’s back–I’ve dreamed of them. So when the recipe popped up on the internet–I couldn’t wait to try it out. There are several versions out there, but this is the one I liked the best–with a bit of GR tweeking–of course! :}

Asian Lettuce Wraps

Ingredients:

2 tsp. vegetable oil

4 cloves garlic, minced

1 Tbsp.  fresh ginger, peeled and minced

3-4 boneless, skinless chicken breasts

3/4 cup  mushrooms, minced

1/2 tsp.  salt

4 cups cabbage, chopped (about 1/2 a head)

1- 8oz can water chestnuts, minced

1/2 cups green onions, minced

1/3 cup soy sauce

2 tsp. sesame oil

1 lemon, zested

1 tsp. hot sauce

1/3 cup cilantro, chopped

1 head iceberg lettuce

Here’s my first tip: Did you notice the word “minced” about 600 times in this recipe? Well, we’re not kidding. So just take twenty minutes and chop all the ingredients and set them aside. If you have a food processor–you are a lucky duck.

I had this cool thing instead…and it worked great.

Who needs a food processor when you can have this food chopper? I bought mine from Pampered Chef...or there’s the entertaining one on TV–called the “Slap Chop.” Either way,  it was fun.

The very easiest way to chop cabbage is to cut it in chunks and drop a piece or two in the blender. Fill with enough water to cover it completely and process on low. Once it is all cole slaw size—really it only takes a few seconds–you just drain the water and there you have it.

Once your ingredients are all pulverized–heat up a large skillet. Really, a large one, this makes a lot. Put in vegetable oil and when it’s hot add minced garlic and ginger. Saute for a minute just until it’s fragrant and then add in the chicken, mushrooms, and salt. Cook until chicken is cooked through.

Then add in the cabbage, water chestnuts, and green onions. Cook for a few minutes until cabbage starts to wilt. Add in the soy sauce, sesame oil,  zest from the lemon, and hot sauce. When everything is cooked through, remove from heat and stir in the cilantro.

To serve, carefully separate the whole leaves from the lettuce. Wash and dry them and keep them in the fridge so they’re nice and cold. Spoon chicken filling onto the lettuce leaf and then roll it up and serve with fried rice or fresh fruit.

Sincerely, I figured the babies would run from this recipe because they really haven’t had a ton of exposure to Asian food–and the aroma is quite exotic. Boy was I wrong! They descended on my plate like lion cubs gone wild. So, I’d say this recipe is a definite hit.

Be brave…try it!


Asian Lettuce Wraps
 
Ingredients
  • 2 tsp. olive oil
  • 4 cloves garlic, minced
  • 1 Tbsp. fresh ginger, peeled and minced
  • 3-4 boneless, skinless chicken breasts
  • ¾ cup mushrooms, minced
  • ½ tsp. salt
  • 4 cups cabbage, chopped (about ½ a head)
  • 1- 8oz can water chestnuts, minced
  • ½ cups green onions, minced
  • ⅓ cup soy sauce
  • 2 tsp. sesame oil
  • 1 lemon, zested
  • 1 tsp. hot sauce
  • ⅓ cup cilantro, chopped
  • 1 head iceberg lettuce
Instructions
  1. Put olive oil in a large skillet.
  2. When it's hot add minced garlic and ginger.
  3. Saute for a minute just until it's fragrant and then add in the chicken, mushrooms, and salt. Cook until chicken is cooked through.
  4. Then add in the cabbage, water chestnuts, and green onions.
  5. Cook for a few minutes until cabbage starts to wilt.
  6. Add in the soy sauce, sesame oil, zest from the lemon, and hot sauce.
  7. When everything is cooked through, remove from heat and stir in the cilantro.
  8. To serve, carefully separate the whole leaves from the lettuce.
  9. Wash and dry them and keep them in the fridge so they're nice and cold.
  10. Spoon chicken filling onto the lettuce leaf and then roll it up and serve with fried rice or fresh fruit.

Perfect Crispy Chicken Tenders

I’m thinking that being able to make an honest to goodness crispy chicken tender — just like way better than what you’d buy at some fancy, expensive restaurant should make you a really valuable woman. Don’t you think? I expect the marriage proposals to come flooding in–non-stop.

Ok, no I don’t. But I’ll tell you this…

If I was married to some cute little Scottish farmer man–he would be falling madly in love with me all over again because, you see, I’m magic.

I can make Crispy Chicken Tenders.

Oooh, ooooh, oooh–so can you…

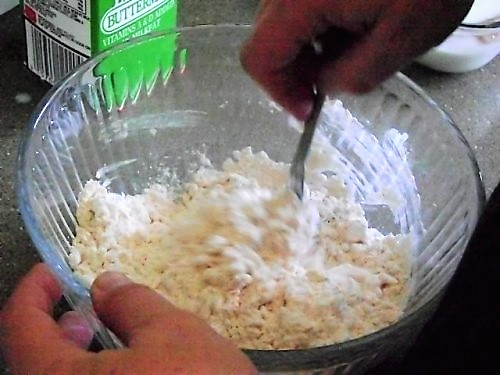
Put two cups of flour in a bowl.

Add 1-1/2 Tbsp Seasoning Salt. If some other chickeny spices sound good to you, add them to the flour.  Personally, the seasoning salt works for me.

Soak a package of boneless, skinless chicken tenders in buttermilk for about 20 minutes. You may be asking, “how much buttermilk, lady. How much?” I’d say about 1-1/2 -2 cups. Save some for later.

Mix seasoning spices into the flour.

Ok, it’s later. Drizzle a few drops of butter milk onto the flour mixture. “Why?” you may ask. Well,  I can’t tell you yet.

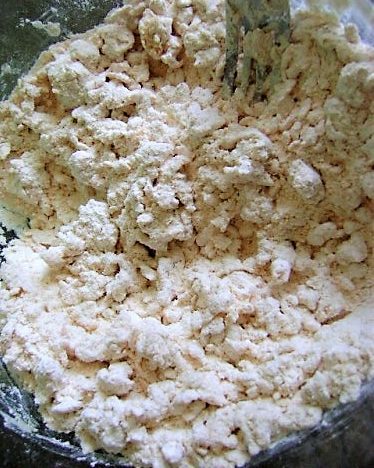
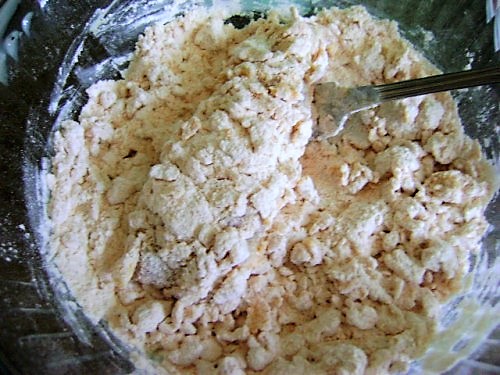
Fluff the buttermilk drops into the flour mixture with a fork…

…until little crumbles form.

Dip each piece of chicken into the flour mixture. Isn’t it cool how the crumbly pieces actually stick to the chicken? Remember the drizzling buttermilk? That’s why.

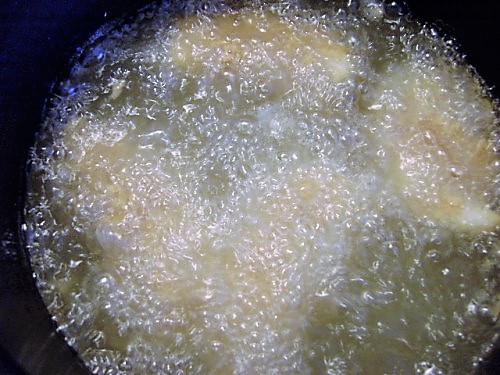
Deep fry the tenders until golden brown–about 3 minutes on each side.

Remove from heat and cool on paper towels. Look at all that crunchy stuff!

The temptation will be to grab one and take a big bite–but be warned–these things are dreadfully hot. So let them sit for awhile, while you make a salad or something.

Oh, I know…

How about if you just bask in the glow of perfect Crispy Chicken Tenders, and your magic-ness.

You’re gonna make lots of friends now.

And if you happen to see my little farmer man with the Scottish accent wandering around out there somewhere, nudge him in the right direction.

He really doesn’t know what he’s missing.

I found this recipe on Pioneer Woman. So there.
4.9 from 11 reviews
Perfect Crispy Chicken Tenders
 
Ingredients
  • 2 Cups flour
  • 1-1/2 Tbsp Seasoning Salt
  • Boneless Chicken--cut in strips
  • Buttermilk
Instructions
  1. Put two cups of flour in a bowl.
  2. Add 1-1/2 Tbsp Seasoning Salt.
  3. Soak a package of boneless, skinless chicken tenders in buttermilk for about 20 minutes.
  4. Mix seasoning spices into the flour.
  5. Drizzle a few drops of butter milk onto the flour mixture
  6. Fluff the buttermilk drops into the flour mixture with a fork until little crumbles form.
  7. Dip each piece of chicken into the flour mixture.
  8. Deep fry the tenders until golden brown–about 3 minutes on each side.
  9. Remove from heat and cool on paper towels. Look at all that crunchy stuff!
 

Get a Load of These…

dscn0726

By load I mean…

busload.

So, there we were, April, the babies and I driving along, minding our own business.

I casually say, “Hey did you know there’s a new bakery in Provo, on University. It sounds cute–Fairy something.”

She says, “Ooooh. Let’s go. Right now.”

Pretty sure she meant, “Right now before we have time to think about it more clearly. Right now, before we have a decent, low fat breakfast of Cheerios and half a banana…for the 27th morning in a row. Right now before we add up the treadmill time this trip will surely cost us.”

As we drove around in the strip mall, trying to find the silly place, I’m looking on both sides of the street, saying, “Where? Where is it?”  Then, suddenly, as if someone turned on a huge floodlight–which would have been completely unnecessary, since it was 10:00 in the morning–but you know–like that, we could just FEEL that the place was near. Turning in slow motion, to the right…we found it.

dscn0724

Sweet Tooth Fairy Bake Shop

Oh my…I think the theme song to Gone With the Wind might have been playing right about now.

We unbuckled the babies and walked cautiously towards the shop. I had goose bumps up and down my arms—no doubt because of the music–and had to suppress the urge to giggle like a 4 year old.

dsc035351

Now, please believe me–I tried to be mature about this. You need to understand that this place was so perfect, all pink and sparkly and fairies and magic–and I haven’t even mentioned the cupcakes yet. That is because as I remember the experience my breathing screws up. I think I may be hyperventilating.

dsc03537

The frosting alone was worth the trip. Heck, looking at the frosting alone, was worth the trip. Wisely,  April has a wrangle grip on Beckham and I had Lily on my hip to avoid any Tasmanian-type rampage. And how could we have blamed them if they had gone completely berserk? We were having a hard time not licking the glass ourselves. The only words that would come out of my mouth were, “Oooohh…man. We’re in so much trouble.”

dsc03536

Sixteen month old, Lily takes one look at the display cases filled with enough sugar to send any regular Jane into a diabetic coma, points to the tray full of  cupcakes and says, “Do it!”

I couldn’t agree more.

dsc035341

The pretty little gal behind the counter would have to admit that once we got the uncontrollable shaking stopped, we were pretty rational.  One each, we told ourselves. That didn’t work because I wanted the Key Lime but I needed the Strawberry Shortcake. So naturally that meant that April needed to choose two–just to be fair. She chose orange and peanut butter cup.

dsc03538

Now most people know that you really can’t put four cupcakes in a box that is designed to hold six cupcakes. It totally messes up the balance of the box-not to mention life in a parallel universe, plus those empty spaces just look stupid.  There was nothing for it but to choose one more…each. She chose the vaNIEla (Named after Stephanie Nielson of NieNie dialogue fame) and I chose chocolate mint–because I had no choice. It was calling to me.

We came promptly home and cut the gooey little beauties in fourths so that we could all have a taste of each. They were all wonderful–of course, but Key Lime is worth crawling to Denver and back for…in my opinion. April’s favorite was the orange. Jillian loved the peanut butter cup. I’ll get back to you on Lyndi’s favorite.

What a heavenly, magnamonious, perfectly perfect afternoon.

dsc03533

Oh, and no, we didn’t tell the men. What they don’t know, we don’t have to share.

hee hee…


————————-

Week 10 Food Storage Prompt:

4 cans of tuna; 4 boxes of macaroni and cheese.

Chocolate Caramel Cookies


If you’ve every wanted to say the words, “Mom loves me the best…” and mean it, here’s your chance to make it happen. No lie.

Just give her these, and she’ll forget she even has other kids.

Try to remain calm…

Ingredients:

1 cup butter

1 cup sugar

1 cup brown sugar

2 eggs

2 tsp. vanilla

2-1/2 cups flour

3/4 cup cocoa

1 tsp. baking soda

3 Heath candy bars (chocolate covered toffee)

1- 12 oz bag Rolos

Preheat oven to 375 degrees. Beat butter and sugars until fluffy, then add eggs and vanilla and beat well. In a separate bowl, mix flour, cocoa and baking soda. Add flour mixture to sugar mixture a little bit at a time and blend well. Cover and chill dough for about 30 minutes.

Chop Heath bars into small pieces. Place in a small bowl and toss with 1 Tbsp sugar.

Once the dough has chilled, wrap a piece around each unwrapped caramel…

forming a 1 inch ball and covering the candy completely.

Roll dough ball into the candy topping—

then place on parchment -lined baking sheet.

Bake for 7-10 minutes. Cookies will look quite soft, but do not over bake.

Cool in pan slightly, then move to a counter to finish cooling. Store in a covered container.

Makes about 4 dozen of the most decadent little things you’ve ever tasted…in your livin’  life.


Chocolate Caramel Cookies
 
Ingredients
  • 1 cup butter
  • 1 cup sugar
  • 1 cup brown sugar
  • 2 eggs
  • 2 tsp. vanilla
  • 2-1/2 cups flour
  • ¾ cup cocoa
  • 1 tsp. baking soda
  • 3 Heath candy bars
  • 1- 12 oz bag Rolos
Instructions
  1. Preheat oven to 375 degrees.
  2. Beat butter and sugars until fluffy, then add eggs and vanilla and beat well.
  3. In a separate bowl, mix flour, cocoa and baking soda.
  4. Add flour mixture to sugar mixture a little bit at a time and blend well.
  5. Cover and chill dough for about 30 minutes.
  6. Chop Heath bars into small pieces.
  7. Place in a small bowl and toss with 1 Tbsp sugar.
  8. Once the dough has chilled, wrap a piece around each unwrapped caramel forming a 1 inch ball and covering the candy completely.
  9. Roll dough ball into the candy topping then place on parchment -lined baking sheet.
  10. Bake for 7-10 minutes. Cookies will look quite soft, but do not over bake.
  11. Cool in pan slightly, then move to a counter to finish cooling.
  12. Store in a covered container.


The Ancient Art of Omelet

Having “sporty” boys in our house always means—that eggs are on the menu. Anytime. Any way.

Want to strike terror in the heart of one of my sons? Just shout, “We’re out of eggs!”

I’m not kidding.

Many a job in these parts, has been accomplished with the promise of an omelet, fried egg sandwich or a scrambled plate. If someone needs cheering up after a disappointing game–we whip up the Classic Egg Bake.

Beats a LifeSaver any day.

When the whole troop is here we make what the bald kid calls “a full skillet.” No, I don’t eat that sausage–

–but the big boys will fight over it–so I let them.

They are bigger than me.

In truth, I could probably get the house painted in exchange for those Egg Cups–that we save for Easter.

Since omelets are the quickest, I probably make them the most—luckily, they are really easy.

Melt a dab of butter in a small non-stick skillet. That’s probably too much in the picture–I know. So a little less than that.

Whip 1-2 or 3 eggs–depending on the size and hunger level of your audience–in a cup or bowl. I use a glass measuring cup and a fork. Add salt and pepper.

Pour into hot pan.

Gently scoot the edges of the cooking egg toward the middle of the pan–letting the raw egg move to the edges. Do this all the way around the pan…

…until there is hardly any undone egg left. Keep your heat down so that the egg doesn’t cook too much or scorch. I can’t stand brown egg–blaugh!

You may need a larger spatula than I was using to carefully turn the whole egg over. I’ve been really impressive at times and flipped the egg over in the air. I’ve also humiliated myself on numerous occasions by missing the pan entirely and wasting someones breakfast on the floor. So, I’d say–do “air flips” or flops as the case may be–at your own risk.

I use a big spatula.

Add cheese, or bacon bits, or ham or veggies.

Fold egg in half and rest the spatula on top-for a minute or so, to keep the egg from unfolding. Garnish with shredded cheese.

Feed it to the masses.

You’ll be worshiped as a Goddess…

..and life will be complete.

Week #6 Food Storage Prompt is:

1- Bottle of Asprin (500 count)