Crayon Leaf Mobile

Remember those crayons you bought a lot of a few weeks ago, and then broke them up and made Confetti Crayons?

Well, I hope you saved some, or still have some around that need sharpening…

You’ll need:

  • Wax paper
  • Crayons
  • Scissors
  • Pencil Sharpener
  • Black Permanent Marker
  • Iron
  • Hole Punch
  • String

First, print out this pdf, of a few outlines of leaves.

Get out your black marker, and trace the leaves on a sheet of wax paper.

Lay out your sheet of wax paper with the leaves on it, on your ironing surface. Put a sheet of clean paper underneath to protect your ironing board.

Then, start sharpening! (And please ignore the scorch marks on my ironing board while you’re at it.)

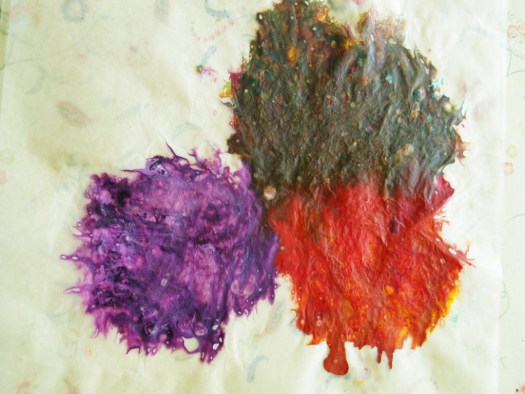
I tried to make my shavings all pretty and in the lines. Don’t bother, it’s a pain, and totally doesn’t make a difference. Just have fun mixing colors, and then just spread them evenly over the leaf shape on the waxed paper. This is a fun way to teach kids about monochromatic colors, complimentary colors, warm colors, cool colors, etc. Oh, and if you mix too many colors, well, you’ll end up with brown. Just a warning.

Place the 2nd sheet of wax paper over the top of your crayon shavings. Set your iron on low. Put another piece of clean white paper on top of your wax paper (to protect your iron). Then, press the iron slowly down on each of the leaves. Don’t move the iron around like you’re ironing something, just press it down, pick it up, move it, place it down again. If you move it, it will smear your crayon wax everywhere, and you’ll have a mess. Trust me on this.

Please note the lovely brown patch. I told you. Too many colors=brown.

Now, cut out your leaves! If you do this part while they’re still warm, they will be easier to cut, but they cool quickly. Don’t worry if your wax paper starts to lift a little on the edges, just put your cut out piece back between the clean paper, give it a little press with the iron, and voila! Sealed up again!

Poke some holes in your leaves, tie some string…

 and hang up somewhere pretty!

~ April

How To Be An American

Sep11th1I only have little ones, right now. Two 20-month-olds, to be exact. And while I know it’s too early for patriot stories, and lessons on territory disputes, and tea parties (the Boston kind)–I know it’s never too early to start teaching little souls what really matters. Like courage, and respect, and bravery. It’s not too early for them to learn reverence for solemn things, and love for people who sacrifice. Even if they aren’t in a developmental place where they can comply with the teachings, those sweet babies notice when I stop and feel. They notice, and to my amazement, generally reflect my mood. They feel. And so, when we speak of things like wars, and remembrances, of towers and countries, and constitutions, I want my sweethearts to understand how much was paid for them to enjoy the life they have. I want them to grow up with a profound sense of gratitude, and a knowledge of how and why their country works. Sep11th3

I am a part of a generation that says a lot, and does very little. Especially in the political arena. We protest, we complain, we bash, we YouTube. And yet, I find that when I actively question many of my peers on the issues they are protesting, or supporting, they have a very finite understanding of how this country works. Of why this country works. Many of them have never even read the constitution, or know how many branches of government we have. Sep11th5

I want my children to know. To know the heritage they are a part of. The country that they must be actively engaged in maintaining. And so far, I’ve found that the best way to teach them is by example. Sep11th2

Today, I’m going to learn a little bit more about this place I call home. I’m going to say a prayer of thanks for those who have gone before. I’m going to remember those who fell, whether on this day 6 years ago, or in the centuries preceding.Sep11th4

And hopefully someday they’ll see my example, and fold their arms, too.

~ April

————————–

Week 26 Food Storage Prompt: 100 lbs. wheat

Blanching: A Tutorial

Blanching07

Because if you, like me, are drowning in tomatoes…

And if you, like me have ever had someone say “Blanche? What are you talking about?”

Or even worse, make a reference to a grouchy retiree from an old tv sitcom…

Then this little tutorial is for you. Or them. Or both of you.

So. Blanching. It’s a really quick and easy way to get the skins off of soft-skinned fruits. Think peaches, apricots, plums, tomatoes.

Apparently, it’s also used to prepare some vegetables for canning–but since I’m scared of canning vegetables, well, I can’t say I’ve ever used it that way.

Here are the details:

Step 1: Fill a large stock pot about 2/3 full of water. Put on to boil.

Blanching01

Step 2: Wash your tomatoes (or other fruit).

Blanching02

Step 3: Place tomatoes in a metal sieve, colander, or steamer basket. My stock pot came with this awesome piece, which is dead useful. The main thing is that your basket needs to be deep enough to completely submerge your tomatoes in the boiling water–as well as have a handle that you can use to pull them out without getting burned. Alternately, if you don’t have a colander that will work, you could drop the tomatoes in the water, and then fish them out with a slotted spoon. This will work, of course, but I wouldn’t suggest it, because if you’re anything like me, there are just too many ways to splash boiling water when you’re trying to drop them in and fish them out. In addition, when you blanch something, you don’t want to cook it, you just want to flash cook the skin so it will come off. The time it takes to fish all the tomatoes out will likely take long enough that your tomatoes will be cooked, at least partially. It’s more messy to peel cooked tomatoes, but if you’re using them in something that will be cooked anyway, it will still work.

Blanching001

Step 4: Submerge the tomatoes in the boiling water for 10-15 seconds.

Blanching03

Step 5: Remove the tomatoes from the boiling water, let drain and cool for several minutes.

Step 6: Cover your working area with a clean kitchen towel. This prevents getting a tomatoey mess all over your counter, as well as helps your working area have a little more traction. Peeled tomatoes are slippery.

Blanching04

Step 7: Using a sharp paring knife, make a slit in the skin of the tomato.

Blanching05

Step 8: Slide the skin off.

Blanching06

Now your tomatoes are ready for sauces, salsas, or bottling!

Blanching10

Using the kitchen towel is also great because you can just fold it up, and your counter is clean again. Remember to rinse your towel well so it doesn’t stain.Blanching09

Blanching11

Blanching12

Blanching13

In the next few days, I’ll be chronicling my adventures with salsa. I’ve already made one batch, my first time. While it’s pretty good, it’s not salsa-y enough for me. Tastes kinda like slightly flavored tomatoes. SO, you seasoned salsa makers, tell me what you know: does salsa need to sit for a while and mix flavors? Should I open up a jar and try it now, a week later to see if I like the flavor better? Should I start over with a new recipe, and if so, do you have one I can try?

~ April

Blanching14

Please! Share your salsa stories and recipes!

A Special Something…

about the glossy ads…

Ausust 31 114

when you think no one is looking…

Ausust 31 116

and you’re completely free to check out the bargains…

Ausust 31 115

or nibble on them.

Ausust 31 119

It’s just so hard to be patient and wait for all those sales…

Ausust 31 118

especially when you’re really hungry right now…

Ausust 31 117

and you still think no one is watching.

Ausust 31 120

But Baby Chompy…here’s something you need to know.

Ausust 31 111

Your good mama is always watching.

Chocolate Zucchini Cake

Ahhhhhh….don’t you just love having to eat your vegetables?

Ausust 31 106

The original recipe called this “Bread.” Let’s be serious guys—this ain’t bread. Bread is lovely but it tries to behave itself. This little number is moist, chocolaty and positively wicked–with no shame whatsoever.

Cake I tell you…cake.

Ingredients

2 cups all-purpose flour
2 cups white sugar
3/4 cup unsweetened cocoa powder
2 teaspoons baking soda
1 teaspoon baking powder
1/2 teaspoon salt
1 teaspoon ground cinnamon
4 eggs
1 1/2 cups softened butter
3 cups grated zucchini
3/4 cup chocolate chips

Ausust 31 107

Instructions:

1. Preheat oven to 350 degrees. Grease and flour a 9×13 inch baking pan.
2. In a medium bowl, stir together the flour, sugar, cocoa, baking soda, baking powder, salt and cinnamon. Add the eggs and butter, mix well. Fold in the chips and zucchini until they are evenly distributed. Pour into the prepared pan.
3. Bake for 50 to 60 minutes in the preheated oven, until a knife inserted into the center comes out clean. Cool cake completely before frosting with your favorite frosting.

Now then—tell me again. How many servings of veggies are we suppose to have each and every day? I want to be sure to get them all in.

Heh, heh, heh.


Chocolate Zucchini Cake
 
Ingredients
  • 2 cups all-purpose flour
  • 2 cups white sugar
  • ¾ cup unsweetened cocoa powder
  • 2 teaspoons baking soda
  • 1 teaspoon baking powder
  • ½ teaspoon salt
  • 1 teaspoon ground cinnamon
  • 4 eggs
  • 1½ cups softened butter
  • 3 cups grated zucchini
  • ¾ cup chocolate chips
Instructions
  1. Preheat oven to 350 degrees. Grease and flour a 9x13 inch baking pan.
  2. In a medium bowl, stir together the flour, sugar, cocoa, baking soda, baking powder, salt and cinnamon. Add the eggs and butter, mix well. Fold in the chips and zucchini until they are evenly distributed. Pour into the prepared pan.
  3. Bake for 50 to 60 minutes in the preheated oven, until a knife inserted into the center comes out clean. Cool cake completely before frosting with your favorite frosting.