The Great Stuffing Fest

I know that Thanksgiving is over and we are all moving merrily onward to Christmas and all that shiny, sparkly stuff that we can’t get enough of. But in the interest of true disclosure, I want to share a few photos from last week. I think it’s is only fair to show you who you are really dealing with here.

I might be sorry…

We’ll see.

To say that our family loves stuffing–would be like saying, “a two thousand pound canary is a pretty big bird.” Yeah. We are certifiably stuffing psychos. We dry bread for daaays–7 loaves worth. And that’s just for our family. When my sister’s bunch and mine had Thanksgiving together, it was more like 12. So don’t look for counter space ANYwhere at our place, because we are using it.

WE’RE DRYING BREAD. Pans and pans and pans of it.

Are you frightened yet?

Perhaps you should be.

We have this big bowl. My sister and I share it because there can’t possibly be two bowls like this on earth. Oh, it’s a big bowl alright (remember the canary?). It’s so big that we have to store it out in my dad’s bake shop, hanging on the wall, because there is no cupboard big enough to hold it–it’s too big. It holds 12 loaves of dried bread without even whining. That’s big.

Have I said big too many times?

It’s for dramatic effect.

So then, it’s a given that someone will need to be willing to sacrifice their life in the service of their fellow family, by cutting up the hoards of onions that a batch like this requires. Jillian selflessly volunteered–and we nearly lost her–

but in the end…

she pulled through.

She is also personally offended that I said we nearly lost her.  Again, for dramatic effect.

Next, we boil the buttery, sagey, oniony broth until it is absolutely perfect. I’m not sure when that is exactly…it’s something that only a true stuffing genius knows.

We’re born with it.


The secret, magical, perfect broth is then poured over the unsuspecting dried bread…mushed around until all the spices are mixed evenly. I don’t have a picture of that because I was busy doing the mushing.

It is then toasted in the oven and fed to the awaiting crowd.
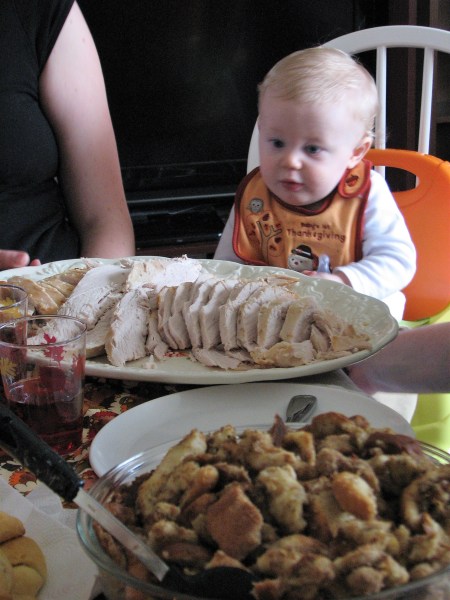
Ok…all that white meat was a big hit too.

They say turkey puts people to sleep…

but we know the truth.

Stuffing’s the culprit.

It’s a knock out…

“The” Stuffing Recipe

You could probably make big money selling this recipe on the black market. If you do–remember…I get half.    :]

Nov. 30 055

Secret Magical Stuffing

(For a Bus Load of People)

Ingredients:

8 small cans of Campbell’s Chicken Broth (Please don’t substitute something else–it won’t be the same)

6-1/2 cubes of butter

3-1/2 Tbsp salt

2 medium onions diced up or run through blender

1-1/2 Tbsp pepper

4-5 Tbsp rubbed sage

1 Tbsp chicken bouillon powder

8-10 loaves of dried, broken up bread (Depends on how big the loaf is)

You are gonna need a big bowl. And no, sorry, you can’t borrow ours…we’re using it.

Dry bread for at least 3 days–5 is better. It needs to be dried hard. Don’t toast it in the oven–it will crumble instead of break.  Break it up in a huge bowl.

Reserve about 6 cups of the broken bread off to the side.  Boil all the other ingredients together for about 15-20 minutes. Pour a cup full at a time over bread and toss until the bread is well coated. You will have some saturated pieces and some that are still dry, so I stir through the bowl and take many of the soaked pieces and smush them onto the dried pieces as you’re tossing it.

That’s really the best way to distribute the broth evenly. If you have plenty of broth, add the rest of the reserved bread a little at a time. Put bread in a foil lined pan and cover with foil–shiny side towards bread– at 350 degrees for about 30 minutes. Use a spatula and turn the stuffing in the pan so the top pieces can have a turn getting brown and golden. Bake for another 30 minutes.  For the last 5-10 minutes, remove foil so the top can be toasty as well. This is the best stuffing in the world.

You must trust me on this.


"The" Stuffing Recipe
 
:
Ingredients
  • LARGE RECIPE
  • 8 small cans of chicken broth
  • 7 cubes of butter
  • 3-1/2 Tbsp salt
  • 2 onions diced up or run through blender
  • 2 Tbsp pepper
  • 4-5 Tbsp Rubbed Sage
  • 1 Tbsp chicken bouillon powder
  • 8-10 loaves of dried, broken up bread
  • ----------------------------------------------------
  • I've added a much smaller version of the recipe--about ⅙ the size of the one above. The instructions are basically the same.
  • SMALL RECIPE
  • Ingredients:
  • 3 cans Campbell's Chicken Broth
  • 2 cubes Butter
  • 1-1/2 tsp. Salt
  • 1 Onion diced or run through a blender
  • ½ tsp Pepper
  • 1-3/4 Tbsp Rubbed Sage
  • 1 tsp Chicken Bouillon Powder
  • 2- 3 Loaves of Bread
Instructions
  1. Dry bread for at least 3 days--5 is better.
  2. Break it up in a huge bowl.
  3. Boil all the other ingredients together for about 15-20 minutes.
  4. Pour a cup full at a time over bread and toss until the bread is well coated.
  5. Put bread in a foil lined pan and cover with foil--shiny side towards bread-- at 350 degrees for about 30 minutes. Turn bread in pan and return to oven to brown again for 30 minutes.
  6. For the last 5-10 minutes, remove foil so the top can be toasty as well.


Pumpkin Chocolate Chip Cookies 2

Pumpkin Spice Chocolate Chip cookies–the EASY version:

1 Spice Cake Mix

1 Regular Can Pumpkin (not the spiced kind, just plain ol’ pumpkin)

1 bag chocolate chips

Mix. Drop on a cookie sheet. Bake at 350 about 10 minutes, or until they start getting a bit golden on top.

These are pretty dense. If you want them more fluffy/cakelike, add the eggs the cake mix calls for.

——

Oh, and you know that extra pie crust dough that you cut off from around your pie, and then feel guilty throwing away? Here’s a great (quick! easy! resourceful!) way to make good use of it.

Break into bite sized pieces…

Brush with milk (or egg whites)…

Sprinkle with sugar and cinnamon…

Place on cookie sheet…

Bake at 350 for 15 minutes (or so. Keep an eye on it, since your altitude/oven/dough might be different than mine).

Yum.

Voila! Some simple ways to make use of your leftovers, and yummy enough that you might just be able to keep little (and BIG) fingers out of the stuffing until dinner!

Happy Thanksgiving!


Pumpkin Spice Chocolate Chip Cookies
 
Ingredients
  • 1 Spice Cake Mix
  • 1 Can Pumpkin (not the spiced kind, just plain ol' pumpkin)
  • 1 bag chocolate chips
Instructions
  1. Mix.
  2. Drop on a cookie sheet.
  3. Bake at 350 about 10 minutes, or until they start getting a bit golden on top.
  4. These are pretty dense.
  5. If you want them more fluffy/cakelike, add the eggs the cake mix calls for.

Cranberry Sauce Re-visited

I ran out to pick up some frozen cranberries and found, to my dismay, that they don’t actually exist. Mr. Walmart and I did try to find them, but no luck in frozen foods. Then, while wandering around in the produce section, I serendipitously discovered the little red devils sitting innocently enough, right next to the packaged salads. I grabbed four bags, and ran. Well actually, I paid for them and then ran…home…in my car.

I did just what the recipe said and it was a pretty fun adventure. And now, I can honestly say that my sauce tastes better than theirs. The back of the cranberry bag said you can store them in the freezer just the way they are. So, I saved the other three bags for a great winter tonic that we’ll talk about soon.

The Elusive Sieve

The previous post mentions a sieve, so, while at the market, I went to the homey gadgets section and found a colander, a strainer, a sifter, a steamer…but nothing that said the word, “sieve.” So I chose a large mesh wire strainer and crossed my fingers. Turns out–sieve and strainer are about the same thing.

Cranberries have teeny, tiny seeds…about a billion of them, and so what you want is a wire strainer with small mesh. The new one was too big and let all the seeds through. So I re-poured the hot jelly through a smaller one–that I discovered in a drawer. Then, I found an old pointy, metal strainer of my mom’s that would have worked too. Yeah…I’m a noob.

So, now we have three. But don’t you worry. I’ll be totally prepared if another seed extraction project comes along…

ahhh…when..

I mean when

Happy Cranberries!

Homemade Cranberry Sauce

Cranberry sauce 005

True Story

So my friend Jenny says to me–“…we’ll be making pies and real cranberry sauce tomorrow.” Just like that.

“REAL cranberry sauce?” says I.

Hmmm…I’ve only seen the kind you squish out of the can, into a glass dish during the Macy’s Parade.

So upon further inquiry, I find that–lucky for all of us–Jenny shares–all the way from Albuquerque.

And yes, I should get extra points for being able to spell Albuquerque.


Take it away Jenny…

“Here’s a recipe for the cranberry sauce that we make every year at Thanksgiving and Christmas:

Cranberry Sauce

Ingredients:

12 oz. bag of cranberries

1-1/2 cups cold water

2 cups sugar

Directions:

Place cranberries and water in a saucepan. Boil rapidly until skins pop open, approximately 5 minutes.

*Do not wear anything white during this process, there will be little red dots everywhere in the kitchen, including you as you step up to the pot to check on the cranberries.” Maybe a lid is a good idea here.

Press the hot cranberries through a sieve (strainer) to remove skins and seeds.

You may need to wait until they cool a bit so that you can easily handle them.

Add sugar.

Return the sauce to the pan and boil rapidly for three minutes, stirring occasionally. This recipe makes nearly 1 quart of incredibly good cranberry sauce.

Cool at room temperature until it sets.

Pour into a mold…or a bowl.

Store in refrigerator.


Homemade Cranberry Sauce
 
:
Ingredients
  • 12 oz. bag of cranberries
  • 1-1/2 cups cold water
  • 2 cups sugar
Instructions
  1. Place cranberries and water in a saucepan.
  2. Boil rapidly until skins pop open, approximately 5 minutes.
  3. Press the hot cranberries through a sieve (strainer) to remove skins and seeds.
  4. Add sugar.
  5. Return the sauce to the pan and boil rapidly for three minutes, stirring occasionally.
  6. Cool at room temperature until it sets.
  7. Pour into a mold...or a bowl.
  8. Store in refrigerator.