Sub-Lime Fruit Sherbet

You know we don’t go very long, around here, in the summer without making a batch of SOME kind of ice cream. Well, this one was actually a bit of an accident–to be honest. We were happily preparing to make our scrumptious Peach Sherbet when we realized that we didn’t have any peach jello. Huge crisis. Wow. Severe lack of preparation skills. Well, being the sturdy mountain women that we were we bravely forged ahead and use lime Jello…instead.

Oh.My.Word.

It was fabulous–and so we began to daydream about what it would be like with, say… pineapple, or mandarin oranges, or raspberries even. You’ll have to try a different fruit and let us know if it tastes as lovely in real life as it does in my imagination.

Gives me goosebumps just thinking about it.

Sub-Lime Fruit Sherbet

Ingredients

1- 6 oz. package Lime jello

2 cups sugar

4 cups water

2 cans diced peaches, pineapple, or mandarins

2 cups syrup from canned fruit

2 cup whipping cream

Directions

Boil water; add Jello and allow to cool. Add sugar, fruit syrup, fruit and cream. Mix and freeze in ice cream freezer until slightly firm.  Remove paddle and replace lid. Store in large freezer about 2 hours before serving.

557

Sub-Lime Fruit Sherbet
 
Ingredients
  • 1- 6 oz. package Lime jello
  • 2 cups sugar
  • 4 cups water
  • 2 cans diced peaches, pineapple, or mandarins
  • 2 cups syrup from canned fruit
  • 2 cup whipping cream
Instructions
  1. Boil water; add Jello and allow to cool.
  2. Add sugar, fruit syrup, fruit and cream.
  3. Mix and freeze in ice cream freezer until slightly firm.
  4. Remove paddle and replace lid.
  5. Store in large freezer about 2 hours before serving.

Gracious BBQ Baby Back Ribs

Oh, yeah…I’m getting brave now. To be honest, I always thought that making my own barbecue sauce and cooking baby backs would be something I’d never, ever do–it just sounded way too hard. But one day, I was just–you know–in a mood, and to my surprise, it was pretty dang simple. And get this–after tweaking the recipe enough to make it my own, it turned out so good that I don’t even miss my beloved Tony Roma’s anymore.

Sorry Tony, but you left town and I’ve moved on.

Now then, please keep in mind that just because I said these babies were easy–doesn’t mean that they are to be thrown together in 4 minutes and nuked in the microwave.

Perish the thought! Anything this amazing will need a bit of savoring time–so to speak. Trust me, you won’t be sorry.

Gracious BBQ Baby Back Ribs Sauce

1 cup Fancy Ketchup

1 cup Heinz Distilled White Vinegar

1/2 cup Dark Corn Syrup

5 Tbsp Brown Sugar

1/2 tsp salt

1/2 tsp Ground Black Pepper

1/2 tsp Garlic Powder

2 tsp Onion Flakes

pinch of Cayenne Pepper

1 Tbsp Molasses

1 tsp vanilla

Combine all ingredients–except vanilla– into a small sauce pan and bring to a boil. Reduce heat and simmer for about 20 minutes or until it becomes as thick as BBQ sauce should be. Allow it to cool for about 10 minutes and stir in the vanilla. Set your lovely sauce aside–in the fridge. You could even make the sauce a few days ahead–to let all the flavors get to know each other, if you like.

Now the ribs:

1 large rack of Baby Back Pork Ribs

Gracious BBQ Baby Back Rib Sauce

To start with, make sure the membrane has been remove from the bone side of the ribs. It’s the thin, rubbery layer that makes that back side smooth. It’s pretty easy to slide a table knife under the membrane and peel it off in one piece. That will make it so that you can trim away any excess fat that was underneath it.

Once the fat is trimmed, cut the slab into 5 or 6 pieces and boil them in a large pot of water for about 30-35 minutes. Remove them from the water and set them on a nice big piece of foil. Now give both sides of each piece a good coating of your illustrious BBQ sauce, seal up the package and set them in the fridge for a few hours. At this point, I got really busy and actually left mine in there for 2 days–which you don’t have to do, of course, but the sauce was really mellow and fabulous after being allowed to grow up a bit.

Preheat your oven to 250 degrees and put the ribs in. Let them cook for 3 hours, then take them out. Coat the ribs with the remaining sauce. Turn the oven on to broil and let them cook out of the foil–for about 15-20 minutes–so that they have a lovely crispy top.

You are now about to enter BBQ Baby Back Rib Heaven.

Have a nice trip.

:}                                                                                                                                                                         564

Gracious BBQ Baby Back Ribs
 
Ingredients
  • 1 cup Fancy Ketchup
  • 1 cup Heinz Distilled White Vinegar
  • ½ cup Dark Corn Syrup
  • 5 Tbsp Brown Sugar
  • ½ tsp salt
  • ½ tsp Ground Black Pepper
  • ½ tsp Garlic Powder
  • 2 tsp Onion Flakes
  • pinch of Cayenne Pepper
  • 1 Tbsp Molasses
  • 1 tsp vanilla
Instructions
  1. Combine all ingredients–except vanilla– into a small sauce pan and bring to a boil.
  2. Reduce heat and simmer for about 20 minutes or until it becomes as thick as BBQ sauce should be.
  3. Allow it to cool for about 10 minutes and stir in the vanilla.
  4. Set your lovely sauce aside–in the fridge.
Notes
1 large rack of Baby Back Pork Ribs Gracious BBQ Baby Back Rib Sauce To start with, make sure the membrane has been remove from the bone side of the ribs. It’s the thin, rubbery layer that makes that back side smooth. It’s pretty easy to slide a table knife under the membrane and peel it off in one piece. That will make it so that you can trim away any excess fat that was underneath it. Once the fat is trimmed, cut the slab into 5 or 6 pieces and boil them in a large pot of water for about 30-35 minutes. Remove them from the water and set them on a nice big piece of foil. Now give both sides of each piece a good coating of your illustrious BBQ sauce, seal up the package and set them in the fridge for a few hours. At this point, I got really busy and actually left mine in there for 2 days–which you don’t have to do, of course, but the sauce was really mellow and fabulous after being allowed to grow up a bit. Preheat your oven to 250 degrees and put the ribs in. Let them cook for 3 hours, then take them out. Coat the ribs with the remaining sauce. Turn the oven on to broil and let them cook out of the foil–for about 15-20 minutes–so that they have a lovely crispy top.


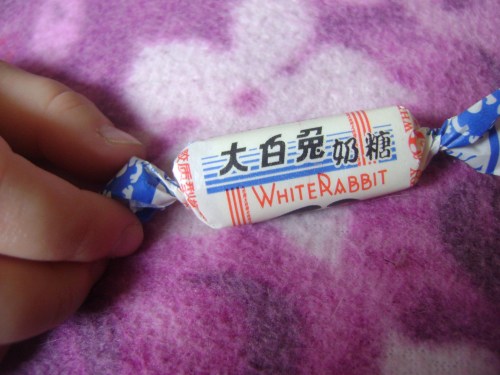
White Rabbit Candy

When I was a little girl, growing up in L.A. there was a small shop down the street that all the kids called the Japanese store. It was a tiny place but just perfect if you wanted to spend the change in your pocket…or your milk money.

On the left side of the counter there always seemed to be a box of chocolate “Ice Cubes” for 5 cents each. But on the right side, at two for a nickle–was the good stuff…the White Rabbit candy. Incredibly cool. Haven’t tasted it in a hundred years.

So when April’s Jacob came back from a trip to the Orient, we were pretty happy with the present he brought us. Here’s why…

After unwrapping each piece, you find a second wrapper–made of rice paper–that you just eat. No, really. It melts in your mouth and then you get to the actual candy. It’s kind of a cream taffy that tastes a lot like–well, cream. So dang good.

So tasty in fact, that we gobbled them up in like 12 minutes.

Pretty sure Miss Chompy ate like 400 of them. So it’s actually her fault that I had to get online and…

buy a bit more. It seems that I have a possession problem.

As therapy–I’ll do a quick little giveaway for one of my precious bags. I should be more generous but I’m not cured yet…so it’s one bag. Sometimes I break out in hives when I share too much. Baby steps, folks…baby steps.

Leave a comment and I’ll announce the winner of the stupendous White Rabbit candy on Friday August 5th at 10am…if there’s any left that is.

**************************************

Happy Birthday Maude!!

:}                                                                                                                                                                          569

Chocolate Zucchini Cupcakes

No, no–you’d never realize it, but there is a goofy green vegetable hidden away in this innocent looking cupcake. And the best part is that you’d never know it was in there because you’ll be too busy rolling your eyes back in your head over the incredible chocolate loveliness–that is this scrumptious cupcake. Try to remain calm…

Chocolate Zucchini Cupcakes

1-1/4 cups butter
1-1/2 cups sugar
2 eggs
1 teaspoon vanilla
2-1/2 cups all-purpose flour
3/4 cup baking cocoa
1 teaspoon baking powder
1 teaspoon baking soda
1/2 teaspoon salt
1/2 cup plain yogurt
2 cups grated zucchini
1 tub chocolate frosting

In a large bowl, cream butter and sugar until light and fluffy. Add eggs, one at a time, beating well after each addition. Stir in vanilla. Combine the flour, baking cocoa, baking powder, baking soda and salt; add to the creamed mixture alternately with yogurt, beating well after each addition. Add zucchini. Batter will be thick and fluffy.

Fill paper-lined muffin cups two-thirds full. Bake at 350° for 18-22 minutes or until cupcakes spring back when touched in the middle. Cool for 10 minutes before removing from pans to wire racks to cool completely. Frost cupcakes.

Make them without shame.

Gobble them up with wild abandon.

After all–we must eat our vegetables, mustn’t we?

Heh, heh.

                                                                                                                                                    570

Chocolate Zucchini Cupcakes
 
Ingredients
  • 1-1/4 cups butter
  • 1-1/2 cups sugar
  • 2 eggs
  • 1 teaspoon vanilla
  • 2-1/2 cups all-purpose flour
  • ¾ cup baking cocoa
  • 1 teaspoon baking powder
  • 1 teaspoon baking soda
  • ½ teaspoon salt
  • ½ cup plain yogurt
  • 2 cups grated zucchini
  • 1 tub chocolate frosting
Instructions
  1. In a large bowl, cream butter and sugar until light and fluffy.
  2. Add eggs, one at a time, beating well after each addition.
  3. Stir in vanilla.
  4. Combine the flour, baking cocoa, baking powder, baking soda and salt; add to the creamed mixture alternately with yogurt, beating well after each addition.
  5. Add zucchini.
  6. Fill paper-lined muffin cups two-thirds full.
  7. Bake at 350° for 18-22 minutes or until cupcakes spring back when touched in the middle. Cool for 10 minutes before removing to wire racks to cool completely.
  8. Frost cupcakes.


Peaches ‘N Cream

Don’t you just LOVE Summer?! Good thing peaches are starting to come on because I’ve been craving them like a nut. How about you? Yeah…I bet you have.

So, this amazing little thing outta just about do it–for all of us. It tastes like a soft, light, fluffy, peachy–cheese cake. Or maybe that’s exactly what it is.

That would explain it.

Crust:

2 cups Graham Cracker Crumbs

6 Tbsp butter, melted

1/4 cup sugar

Mix ingredients together and press into the bottom of a 13×19 pan. Chill.

Filling:

4- 8oz pkg. Cream Cheese

3/4 cup sugar

1 small pkg. peach jello

2-3 fresh peaches–peeled and chopped

1- 8oz Cool Whip

Beat the cream cheese, sugar and jello powder until fluffy. Add peaches and whipped topping and blend on low speed until mixed well. Spoon over graham cracker crust. Chill until firm–a few hours. Serve cold.

Bring some over to my house–we’re fresh out.

:}                                                                                                                                                                          276

Peaches 'N Cream
 
Ingredients
  • Crust:
  • 2 cups Graham Cracker Crumbs
  • 6 Tbsp butter, melted
  • ¼ cup sugar
  • Mix ingredients together and press into the bottom of a 13x19 pan. Chill.
  • Filling:
  • 4- 8oz pkg. Cream Cheese
  • ¾ cup sugar
  • 1 small pkg. peach jello
  • 2-3 fresh peaches--peeled and chopped
  • 1- 8oz Cool Whip
Instructions
  1. Beat the cream cheese, sugar and jello powder until fluffy.
  2. Add peaches and whipped topping and blend on low speed until mixed well.
  3. Spoon over graham cracker crust.
  4. Chill until firm--a few hours. Serve cold.